
| click on a backyard theater concession stand | ||||
| Snack Bar with Chasing Lights | Portable PVC Snack Bar | Rolling Lemonade Stand - In a Kit | ||
PVC Snack Bar #1 with Chasing Lights
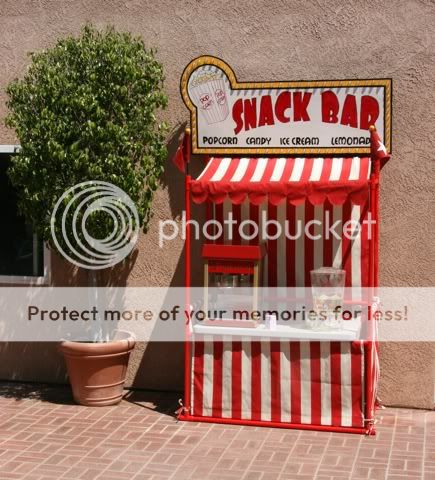
The snack bar consists of an 1/8-inch masonite sign with LED chaser lights,

four fabric panels, each with a casing and two ties,

a 2- by 4-foot Lifetime table,

and one-inch PVC pipe, sprayed with red Krylon Fusion for Plastics.

Normally, the table will sit inside the frame for self-serve, as we rarely have more than 8 adults and children.
During larger events (soccer parties), someone will man the snack bar and the table will sit part-way outside the frame.

When it does sit outside the frame, it will have it's own apron (attached with duct tape rolls).

I designed the frame around a table that I already had. There have been times when I wished the snack bar were longer.
We don't host very large gatherings, but if you do, go for a longer table.
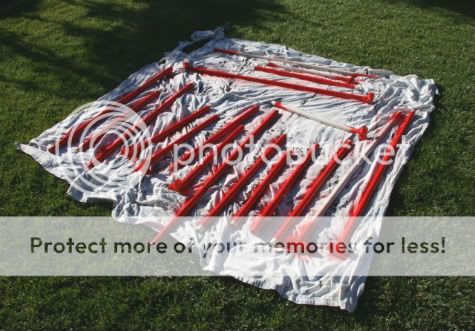
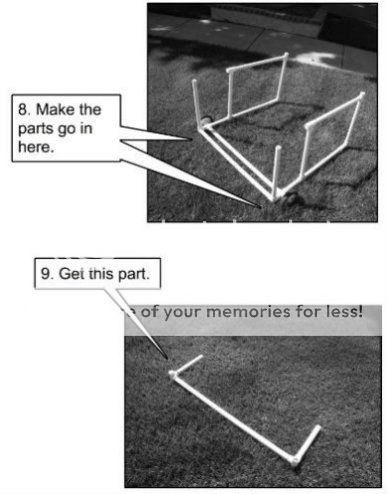
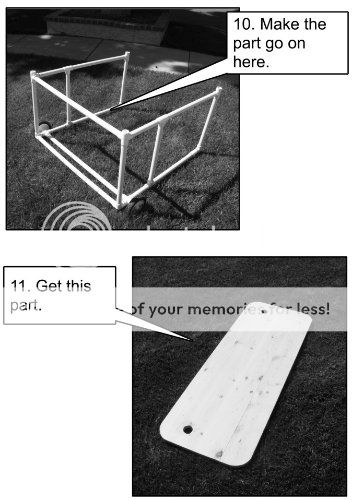
The construction is as follows:
As the 1-inch PVC frame is assembled, the fabric panels are slipped on.

The frame is placed on its back and the sign is attached to the top.

Then the unit is walked into a standing position (much like putting up a large screen).

Finally, the lights are plugged in and the top fabric panel is pulled over the highest PVC bar
and allowed to drape down the back.
The panels are tied at the bottom. Flags are inserted.

NOTES
Since the PVC Snack Bar was my own design and I'd assembled and disassembled it 4 times during its first season of use, I assumed I'd be able to quickly and easily reassemble it at the beginning of the next season.
BIG MISTAKE.
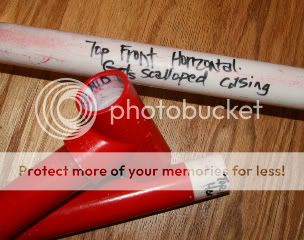
Learn from me. Label all your parts.
Label inside the pole joints or label outside the pole joints or label directly on the poles themselves,
but whatever you do, LABEL THE POLES!
After the first winter layoff, all the parts that seemed so distinctive last summer, start to look alike.
Trust me on this one.
The concession sign is screwed directly to the PVC frame, which provides stability to the thin, wobbly masonite. If you use a design such as this, be careful not to place the pipe where you will be locating the lights.
There are three separate light strings, with 25 bulbs each, edging the sign.

I got the controller from ImaginaryColours.com. The company was slower than molasses when it came to shipping. I found the website confusing to navigate and ended up emailing them to make sure I was getting what I wanted. They do seem to answer their emails quickly. I also had to email them and ask, "Where's the stuff I ordered?" I got a prompt reply and received the controller a few days later.
Despite all that, I've used them twice and been happy with their products, if not with their delivery time. They're pretty helpful over the phone, too.
The controller will take any kind of string lights. They also have a controller that is for just two strings and one that uses four strings.
I used the 3-Channel Chase Controller with adjustable speed, but WITHOUT ADDITIONAL FUNCTIONS.
Let's call the light strings "A String", "B String", and "C String" Each bulb is numbered, starting with 1.
I put bulb A1 in the first hole, bulb B1 in the second hole, bulb C1 in the third hole,
bulb A2 in the fourth hole, bulb B2 in the fifth hole, bulb C2 in the sixth hole,
bulb A3 in the seventh hole, etc, etc.
Then I plugged them in and adjusted the controller until I got the speed I liked. The controller I used DOES NOT make the lights blink, twinkle, fade, etc. It just turns each of the light strings on and off in repeated sequence so that the light bulbs appear to be running around the sign.
Whatever number of bulbs you want going around your marquee, you'll have to divide that number by three and then buy three strings that are closest to that number. Also, each string has to be long enough to stretch the entire length of your project. I suspect that LED lights, plugged end-to-end will work as well.
If you are building a large marquee, it may be best to buy one long string of lights with the controller already built in. I went with a separate controller because I already had lights that I liked.

Just to be on the safe side, I added a small eye screw to the stucco wall (painted wall color) and used a zip tie to secure at the top.
COST
As near as I can figure, the cost of pipe and fittings should run about $70 dollars. (I found one-inch specialty fittings here.) This stand could be made much more cheaply if you used 3/4-inch pipe, which would work just fine. But I'm pretty sure 3/4-inch won't support a heavy sign, no matter how you may reinforce it. If you don't plan on using a large number of string lights, which are deceptively heavy, 3/4-inch pipe is the way to go.
It took about one and one-half cans of red Krylon Fusion for Plastics to cover the visible PVC parts. I'm not very conservative when it comes to spray painting something. You might be able to get away with one can. The cost per can was $7.00.
The fabric is 56 inches wide.
Wide striped fabric can be found at Fabric.com. It runs $8.98/yd. Outlet stores are bound to be cheaper. I used about 6 yards for all four panels and the apron around the table. At $9/yard, that's $54.
The controller ran about $26 dollars.
I already had the masonite, PVC cement, string lights, table, acrylic paints for the sign and materials necessary to make the flags (fabric, dowels, wooden balls). You'll need to factor that in.
My total was $164. I am figuring on the high side, using rather pricey fabric. Nothing I purchased was on sale, nor did I use any discount coupons.
 My granddaughters pressed me into service once again.
 I was asked to bring my snow cone machine to the car wash fund raiser for Girls Soccer.
I thought we needed a little pizzazz to draw attention to the additional money-maker,
so I designed a more portable version of the snack bar shown above.

The design was modeled after a tabletop decoration I saw
on the Oriental Trading website here and here.


There are two fabric panels: one with two ties and a casing, and a longer panel that serves as the table's skirt.
Velcro (the soft, fuzzy part) was sewn around the inside top of the skirt panel. The table has the velcro with the hooks. This is where it got a little maddening. I needed to buy twice the necessary velcro length: one package of the sew-on kind and one with a sticky back. Much as I tried, the sticky back just would not stay on the fabric and, well, you can't sew onto a table. Hence, one package of each kind.
In addition, there's a red slipcover (sort of like a real wide pillowcase) for the sign.
I bolted the bottom of the PVC frame to the 2-foot by 4-foot table. I leave the two pieces there permanently. They are tightened down with wing nuts so that I can take them off should I ever wish to use the table for other things.


As you can see, these two pipes span the width of the table, but there are no pipes that stretch the length of the table. Although they would have added to the stability of the frame, I excluded them because, in the front, a pipe would interfere with opening the freezer door, and in the back, a pipe would hinder movement, should I want to work the snow cone machine from the back side.

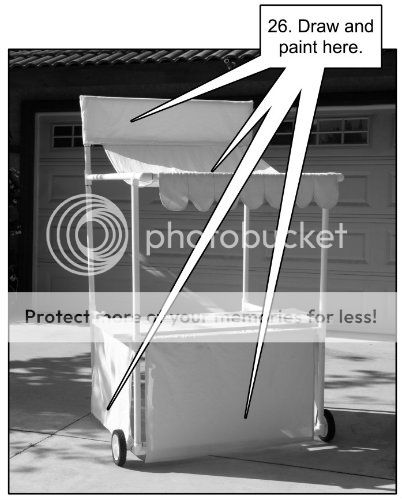
One more look at the finished product.

I made this tabletopper to match my already existing snack bar, but it can easily be changed. If you can sew a straight line (or iron on a strip of Dritz No Sew Hemming Tape), you can quickly and easily adapt this decoration to any party theme. Change the sign or the skirt, or if you're ambitious, all three fabric pieces.
 For example, you want to use the table to serve food on July 4th, paint a few white stars on a blue slipcover sign. To coincide with a Pirates of the Caribbean Movie Night, paint a couple of white skulls and cross bones on a black slipcover. And . . . the slipcover pirates sign would work with a black table skirt for a Halloween Party. See? Endless party possibilities!
Use a raffia table skirt for a South Pacific/luau theme.
Throw an old fringed serape on top to make a canopy
for Cinco de Mayo.
 |  |
 |  |  |
 |  |  |

Rolling Lemonade Stand "Kit"


Maybe this lemonade stand will be of interest as well.
I wanted my grandchildren to be active participants in the building of their lemonade stand.
and therefore, designed the stand in kit form, needing assembly before it could be used.
The kit comes with an instruction booklet and a rubber mallet. You supply your own paint, ice chest, lemonade dispenser, and balloons.
Since the two youngest children were beginning readers, the instruction booklet contained many photos and very basic sight vocabulary.


Working slowly but surely, you'll get to the fabric panels and sign.


Use twice as many cans of spray paint than is really necessary.

Tongue position helps with the painting. Don't forget to argue over who gets control of the paint pen.


Don't read carefully so that you end up putting the canopy on upside down - twice!

